Embarking on the journey of creating henna tattoo mehndi designs can be as exciting as it is rewarding. Whether you’re looking to add a touch of tradition to your look or simply enjoy the art of temporary tattoos, henna offers a beautiful, non-permanent way to express yourself. Beyond its aesthetic appeal, henna has cultural significance and a rich history that adds depth to its application. Find the best henna tattoo mehndi design simple.
In this comprehensive guide, we’ll dive into the basics of henna tattoo designs, offering you step-by-step instructions to help you create stunning patterns, even if you’re a complete beginner. So, grab your henna cone, and let’s get started on this artistic adventure! Tips on mehndi designs.
Understanding Henna: The Art and Its Origins
What is Henna?
Before we dive into the designs, let’s take a moment to understand what henna is. Henna, also known as Mehndi, is a natural dye made from the leaves of the henna plant. This plant, scientifically known as Lawsonia inermis, thrives in arid climates, and its leaves have been harvested for centuries for their dyeing properties. The dye is created by drying and crushing the leaves into a fine powder, which is then mixed with liquid to form a paste.
Cultural Significance of Henna
Henna has been used for centuries across various cultures, primarily in South Asia, the Middle East, and North Africa, for body art and hair dyeing. In these regions, it is an integral part of celebrations and rites of passage, such as weddings and religious festivals. In India, for instance, brides often adorn their hands and feet with intricate henna designs, symbolizing joy, beauty, and spiritual awakening. The use of henna in these cultures is not just for aesthetic purposes but is also believed to bring good luck and protection.
The Beauty and Versatility of Henna
The beauty of henna lies in its simplicity and versatility. With just a henna cone, you can create intricate designs that can last for about one to three weeks on the skin, depending on skin type and aftercare. Henna’s natural reddish-brown stain is subtle yet striking, making it suitable for both casual and formal occasions. The key to a good henna tattoo is patience and practice, as the flow and pressure of the application significantly affect the outcome. Now, let’s explore some basic designs you can start with.
Getting Started with Henna: Tools and Tips
Essential Tools for Henna Art
To create your own henna tattoos, you’ll need a few basic tools. The primary tool is the henna cone or paste. You can purchase pre-made henna cones, which are convenient and ready to use, especially for beginners. Alternatively, you can make your own paste by mixing henna powder with lemon juice, sugar, and essential oils. Tracing paper or stencils can be helpful for beginners to outline designs, while tissue paper and cotton swabs are essential for cleaning up mistakes and making precise corrections.
Tips for Beginners: Mastering the Basics
- Practice on Paper First: Before trying your design on skin, practice on paper. This helps you get a feel for the flow of the henna and the pressure needed to create lines. Understanding how to control the cone’s pressure will help you achieve consistent results.
- Start Simple: Begin with basic designs and shapes, such as dots, lines, and simple flowers. As you gain confidence, you can move on to more intricate patterns. This gradual progression not only builds your skills but also boosts your confidence in handling more complex designs.
- Keep a Steady Hand: A steady hand is crucial for smooth lines. Practice holding the cone like a pen, and use your pinky finger as a stabilizer on the surface. This technique helps maintain control and precision, especially when creating detailed patterns.
Experimenting with Different Styles
As you become more comfortable with henna, experiment with different styles and cultural influences. Explore traditional Indian, Arabic, and Moroccan designs, each with unique characteristics and motifs. This exploration will enrich your understanding of henna art and inspire creativity in your designs.
Basic Henna Tattoo Designs
The Classic Dot and Circle: Foundation of Henna Art
Start with the simplest of designs. Dots and circles form the foundation of many henna patterns and are great for beginners. These basic elements are versatile and can be combined in various ways to create intricate designs.
How-To:
- Create a series of small dots in a line or circle. The spacing and size of the dots can be adjusted to add variety and complexity.
- Experiment with spacing and size for variety. You can create borders, fill spaces, or add accents to larger designs using dots and circles.
Floral Patterns: Adding Elegance to Your Designs
Flowers are a staple in henna designs and can be as simple or as complex as you like. Floral motifs are not only beautiful but also symbolic, representing growth and beauty.
How-To:
- Begin with a small circle in the center, which serves as the flower’s core. From this point, you can expand outward with petals.
- Add petals around the circle. Start with simple shapes and gradually add more detail as you become more comfortable. Experiment with different petal shapes and sizes to create diverse floral designs.
The Leafy Vine: Graceful and Flowing
A beautiful, flowing design that can adorn your hands or feet, the leafy vine adds a touch of nature to your henna art. Its organic flow is both calming and sophisticated.
How-To:
- Draw a curved line to represent the vine. This line can wind around the hand, wrist, or foot, creating a dynamic movement.
- Add small leaves on either side of the vine. Vary the size and direction for a more natural look. Leaves can be simple or detailed, depending on your preference.
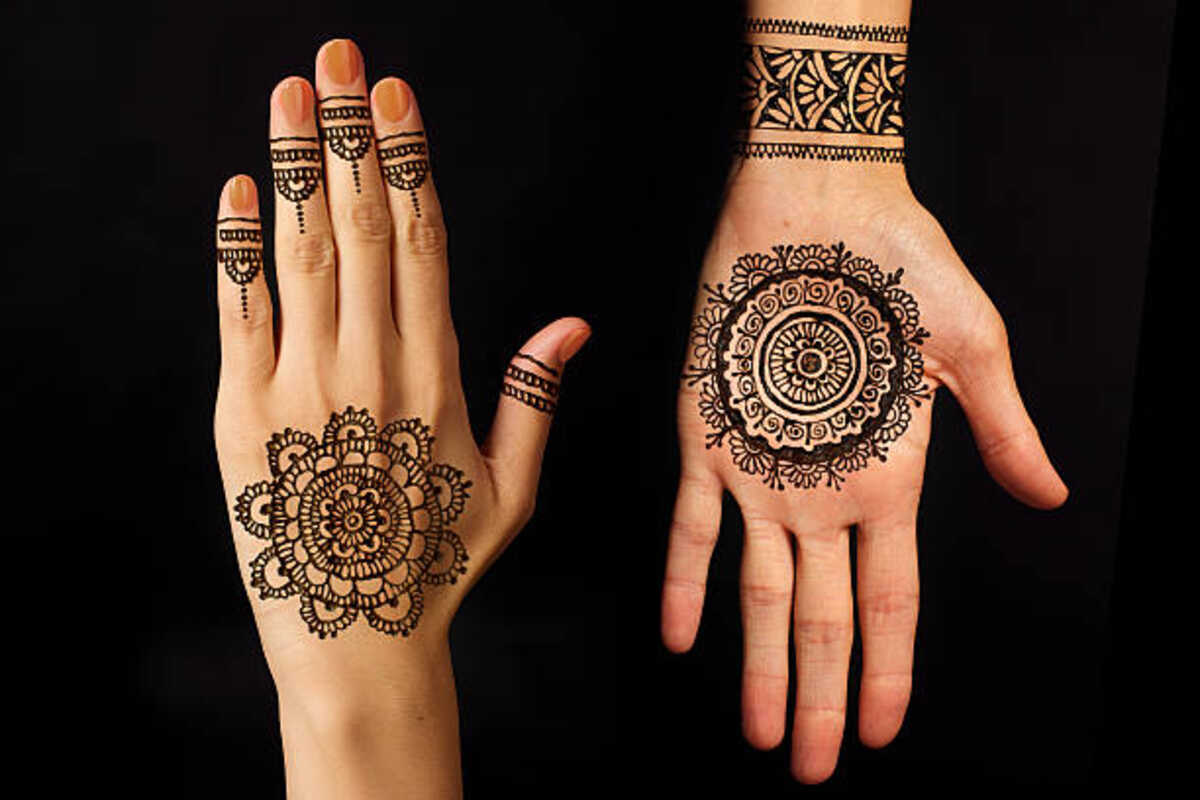
The Mandala: Symmetry and Precision
Mandalas are intricate and symmetrical, making them a great practice for developing your precision. These designs are not only visually appealing but also meditative, reflecting harmony and balance.
How-To:
- Start with a small central circle. This is the starting point for your mandala, from which all patterns radiate outward.
- Create layers of patterns around the circle, such as petals or geometric shapes, ensuring symmetry. The key to a stunning mandala is balance, so take your time to ensure each side mirrors the other.
Combining Elements: Crafting Unique Designs
Once you are comfortable with basic patterns, try combining different elements to create unique designs. Mixing dots, circles, floral patterns, vines, and mandalas can result in intricate compositions that reflect your personal style and creativity.
Tips for Applying and Caring for Henna Tattoos
Application Tips: Ensuring a Beautiful Finish
- Clean Skin: Make sure the skin is clean and free of oils before applying henna. Oils can create a barrier that prevents the henna from staining effectively. Exfoliating the area beforehand can also help achieve a deeper stain.
- Apply Even Pressure: Consistent pressure ensures even lines and saturation. Practice applying uniform pressure on paper before moving to the skin. This consistency is crucial for achieving a professional-looking design.
- Let It Dry: Allow the henna to dry completely, which can take up to an hour. Avoid moving the area to prevent smudging. Once dry, the paste should crack slightly, indicating it’s ready to be scraped off.
Caring for Your Henna Tattoo: Prolonging the Beauty
- Avoid Water: Keep the area dry for at least 24 hours after application to allow the stain to deepen. Water can wash away the developing stain, so it’s best to avoid it during this period.
- Apply Lemon Sugar Sealant: Dabbing a mixture of lemon juice and sugar on the design helps to set the henna and intensify the color. This mixture acts as a natural adhesive, keeping the henna in place and moist, allowing for a richer stain.
- Protect from Abrasive Surfaces: Avoid rubbing the henna design against rough surfaces, as this can fade the stain prematurely. Wearing loose clothing and avoiding friction will help maintain the design’s integrity.
Common Mistakes and How to Avoid Them
Mistake 1: Smudging the Design
Solution: Allow plenty of time for the henna to dry. Avoid touching the design while it’s wet. To prevent smudging, keep your hands or feet still during the drying process, and consider using a fan to speed up drying.
Mistake 2: Uneven Lines
Solution: Practice controlling the pressure and speed of your henna cone. Consistency is key. If you struggle with maintaining even lines, slow down your application and focus on steady movements.
Mistake 3: Fading Too Fast
Solution: Follow the care instructions diligently, and remember that the palms and feet tend to hold the stain longer than other body parts. For longer-lasting designs, ensure the henna paste remains on the skin for as long as possible, ideally overnight.
Mistake 4: Incorrect Mixing of Paste
Solution: If making your own paste, ensure the right consistency by gradually adding liquid to the henna powder. The paste should be smooth and free of lumps. Test on paper first to ensure it flows easily from the cone.
Mistake 5: Choosing the Wrong Cone
Solution: Select a cone with a tip size that matches your design complexity. Finer tips are best for detailed work, while broader tips can cover larger areas quickly. Experiment with different cones to find what works best for you.
Conclusion: Embrace the Art and Tradition of Henna
Creating stunning henna tattoo mehndi designs is an art that anyone can learn with a bit of practice and patience. Start with the basics, hone your skills, and soon you’ll be crafting intricate designs that reflect your unique style and creativity. Remember, henna is not just about the final design; it’s about the joy of the process and the tradition behind it.
As you continue on your henna journey, embrace the cultural richness and personal expression that henna offers. Each design tells a story, whether it’s a simple dot or an elaborate mandala. So, keep practicing, enjoy the journey, and let your creativity flow!